-
Posts
25 -
Joined
-
Last visited
Reputation
35 DevelopingProfile Information
-
Alias
Skeletor
Recent Profile Visitors
1521 profile views
-
It certainly surprised me as to how much of an effect they have. As good as +/- 10% sounds, I usually put natures on the backburner compared to IVs. But they can have an equal if not greater effect, mostly depending on EVs and base stats! Your numbers on the Mew look about right, at least according to what I've looked at. I get about 114-115 Spd or 60-61 IVs for you example. It's a fun little puzzle! I think I first started thinking about this when I realised that I could make my Timid Gengar almost as fast as my Adamant Crobat, and at Lv 85 they were only ~10 speed apart, despite the 20 base speed difference. This is a very good point! I'd not considered this in the context of Reborn/Rejuv/(Deso? Not sure if Deso has this feature), but it's definitely worth taking into consideration. This is a nice way of looking at the problem! Ignoring the floor/ceiling functions would definitely have made my life easier, I just wanted a nice analytic expression for the allowed values of IV/Base that would give the same stat...unfortunately I was only able to do it for Lv 100.
-
Glint started following Dev Appreciation Thread and [Warning: Maths] On natures, IVs and base stats
-
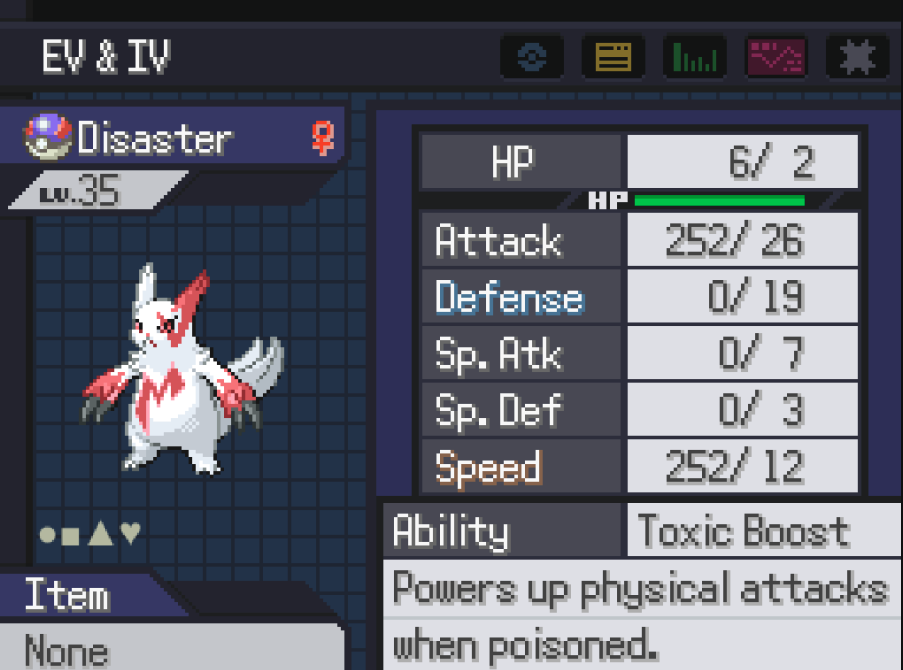
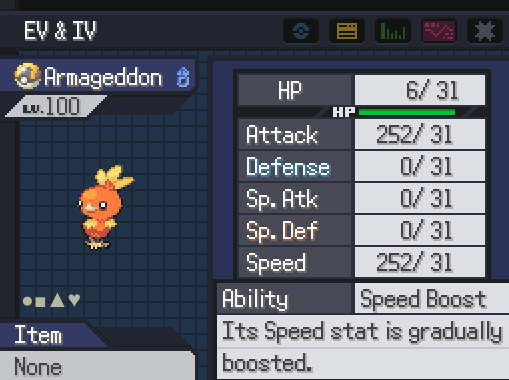
(If anybody knows a better place to put this post, please move it there) Hi all! This is my first post over on the reborn side of things, although to be honest I didn't really know where to put this ... Anyway! Before we go any further, a warning: This post contains maths. If you do not like maths, you will not like this post. But TL;DR, nature important. There's also a summary at the end, so maybe go read that too. ---------------------------------------------------------------------------- Introduction With that warning out of the way, let's get started. During a recent run of mine I caught this beautiful Zangoose called Disaster: I thought she was pretty neat, 26 Atk IVs and +Spd nature, despite only having 12 Spd IVs. However, I showed Disaster to a couple of people and got mixed reactions, with some thinking that she was absolutely trash because of the 12 Spd IVs. It got me thinking "I'm pretty good at maths...let's figure out just how good she is". So that's what we're gonna do here, but a little bit more generally. I'll try and answer the question: Just how good is a good nature? ---------------------------------------------------------------------------- Calculating the IV-Nature equivalent: A tale of floor functions To answer this question, we first need to know how a stat is calculated. Stats other than HP (which is irrelevant here, since we can't change it with nature) can be calculated using: Stat = Floor[ Nature * (Floor[ (2 * Base + IV + Floor[ EV/4 ]) * Level/100) ] + 5) ] Where Nature is 1 for a neutral nature, 0.9 for a hindering nature and 1.1 for a beneficial nature, whilst the floor function is defined such that it picks out the largest integer less than or equal to its argument. e.g: Floor[ 1.2 ] = 1, Floor [ -3.7 ] = -4. Ok great. So what next? To try and quantify how good or bad a nature is, I'll try to convert it into and IV equivalent. So let's suppose something has a neutral nature (Nature = 1) and IV IVs. I'll answer the question "for a different nature, which we will call Nature', what IV value, which we will call IV' , would give the same stat total?". Seems simple right? Let's get started. Well, there are a few problems here. First off, the floor function has no inverse so we can't just "solve for IV' ". But what we can do is use the definition of the floor function to say that: Stat <= Nature' * (Floor[ (2*Base + IV' + Floor[ EV/4 ]) * Level/100) ] + 5) < Stat + 1 Great! That's one of the floor functions gone at least. We can tidy up a little more and get the following inequality: (Stat/Nature') - 5 <= Floor[ (2 * Base + IV' + Floor[ EV/4 ]) * Level/100) ] < ((Stat + 1)/Nature') - 5 Aaaand, we're stumped again. Getting rid of this next floor function isn't very easy (trust me, I've tried...a lot). If anybody knows how to get the most general solution here then please tell me! Since I haven't been able to figure it out though, we'll stick with a more specific case. If we're at Level = 100, we see that everything inside the floor function is an integer, so the floor function goes away nicely. Leaving us with: (Stat/Nature') - 5 <= 2 * Base + IV' + Floor[ EV/4 ] < ((Stat + 1)/Nature') - 5 Which we can solve quite easily for IV': (Stat/Nature') - 5 - (2 * Base) - Floor[ EV/4 ] <= IV' < ((Stat + 1)/Nature') - 5 - (2 * Base) - Floor[ EV/4 ] But we want our new IV stat, IV', to be an integer. So we're going to stick in some floor and ceiling (the opposite of the floor function...great names I know) functions of our own in. Giving: Ceiling[ (Stat/Nature') - 5 - (2 * Base) - Floor[ EV/4 ] ] <= IV' < Floor[ ((Stat + 1)/Nature') - 5 - (2 * Base) - Floor[ EV/4 ] ] For those of you still reading, congratulations! We've found the range of values of IV' that will give the same total stat with a nature Nature' as something with IV and Nature. ---------------------------------------------------------------------------- A worked example A worked example is always nice to put these things into perspective and give you an idea of exactly what I've been trying to do here. Let's suppose we're ready to take on the champion with our trusty Armageddon: He's got perfect attack IVs and EVs, so we're set, right? Well, let's find out just how good Armageddon is using what we've learnt so far. With those stats and that nature, Armageddon has: Stat = 219 Base = 60 EV = 252 Using what we derived so far, this means that if instead of a neutral nature Armageddon had a beneficial nature, Nature' = 1.1, he'd have the same stats with: IV' ~ 12 Yep, that's right! Stated in words: "Armageddon with 31 Atk IVs and a neutral nature is the same as a Torchic with 12 IVs and a beneficial nature." Oops! Looks like Armageddon isn't so perfect at all... Better get back to breeding! ---------------------------------------------------------------------------- Calculating the Base Stat-Nature equivalent: It's easier this time...because we've done it already We could have asked the question above in a different way: "for a different nature, which we will call Nature', what base stat value, which we will call Base', would give the same stat total?". All we're doing here is saying that instead of treating the beneficial nature like having more IVs, we could also picture it like having a higher base stat to start with. Given what we've done so far, this isn't too hard to calculate. We just rearrange what we have above to find: Ceiling[ (1/2) * ((Stat/Nature') - 5 - IV - Floor[ EV/4 ]) ] <= Base' < Floor[ (1/2) * (((Stat + 1)/Nature') - 5 - IV - Floor[ EV/4 ]) ] That wasn't so bad now, was it? So what does this mean for our trusty Armageddon? Well, just like before we can go ahead and plug in the numbers for Armageddon: Stat = 219 IV = 31 EV = 252 And we find using the above: Base' ~ 50 And once more in words, to make it clear: "Armageddon with 31 Atk IVs and a neutral nature is the same as a Torchic with 50 base attack and a beneficial nature." This, coincidentally, is exactly the attack stat of an Oddish. So maybe we should have said it a little differently: "Armageddon with 31 Atk IVs and a neutral nature hits as hard as a very angry Oddish." Wow, we really need to work on Armageddon... ---------------------------------------------------------------------------- So what does this mean for Disaster, our beatiful Zangoose? So just how good is Disaster? After all, that's why I started thinking about this in the first place. Let's calculate the Lv 100 IV and base stat equivalents, just like we did for Armageddon. We'll have to work slightly differently here, since we're starting with a beneficial nature and trying to find the "bad nature" equivalent instead. Unfortunately the floor functions make this hard to do analytically, so I told my computer to do it for me instead. For Disaster's speed stat, we have: Nature = 1.1 Base = 90 IV = 12 EV = 252 So if instead she had a neutral speed nature, what IVs/base stat would she need to be as fast? Our computer tells us that: IV' ~ 38 Base' ~ 103 So our fabulous Disaster (I hope somebody gets this reference) is as good as a Zangoose with neutral nature and 38 Spd IVs, or a base stat of 103. To put that into perspective, that's faster than both Garchomp and even Oddish. ---------------------------------------------------------------------------- Summary If you're reading this coming straight from the start, or you've struggled to follow along, I'll try to summarise nicely: Nature is very important. Probably even more so than IVs and base stats, depending on what you're using to start with. I didn't realise quite how important it was until I started making this post, and I've pleasantly surprised myself even. Adamant nature Oddish hits as hard as Serious Torchic. Yep, it's true. Disaster is beautiful and very fast. So stop being mean to her. That is all. Peace!
-
Hi all! As most of you probably know, v13 will be out in a few hours! excitement noises As you probably also know, it's been two years since v13. This means that the devs have put in two years of work to give us something awesome, on top of the work to give us the other 12 vs! Sooo, I'd like to give a big thank you to all the devs and the staff for giving their time to us. <3 that is all
- 16 replies
-
- 28
-

-

-

-
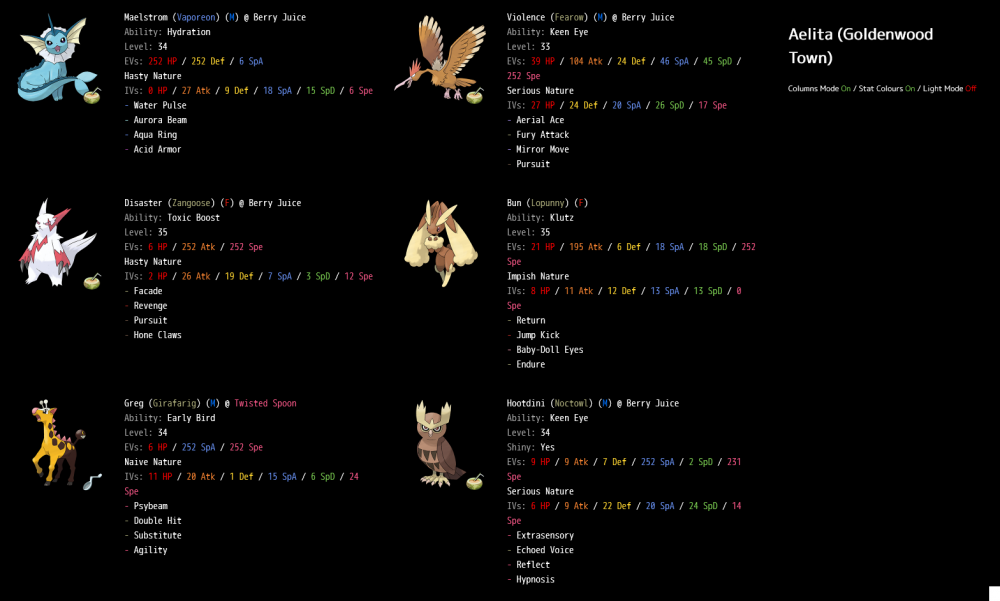
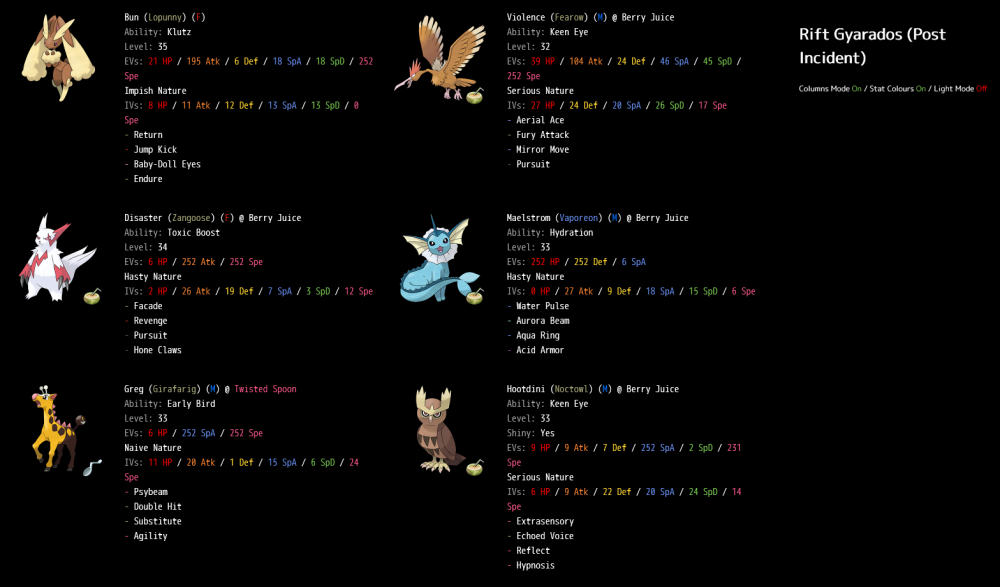
Hi all, welcome back. Let's get started with Chapter 4! We make our way back to Goldenwood Town, where Venam opens up the entrance at last. After being greeted by a welcoming scene, we get our first and only encounter of the Chapter, as well as (I think) the only ground type in the run, Bunnelby! We name Bunnelby "Chungus" (seriously, what else would you call this?) and store it in the box for now. Before continuining the story, we take the time to complete the Rift Gyarados sidequest. After a fairly easy battle against "C" we make our way to Goldenwood Forest, where Rift Gyarados awaits at a whopping Lv 49. Here's the team: And here's the video! Not much of a fight in the end now that we have access to Facade on Disaster. I feel like a lot of battles are going to go this way until the game catches up with us. Anyway, that's Rift Gyarados down for good this time! Back to Goldenwood Town! Back in Goldenwood we meet Narcissa (again), who tells us to "subdue" the outsiders in the Pokémon Centre. Before we do, however, we're challenged to a battle by Aelita! Here's the team: And here's the battle! "Hm...I did a lot better than I thought I would!" - Aelita, doing really badly. After seriously disrespecting Aelita we're able to move on with the story and take on Wispy Tower, but that's for the next segment! Until then, peace!
-
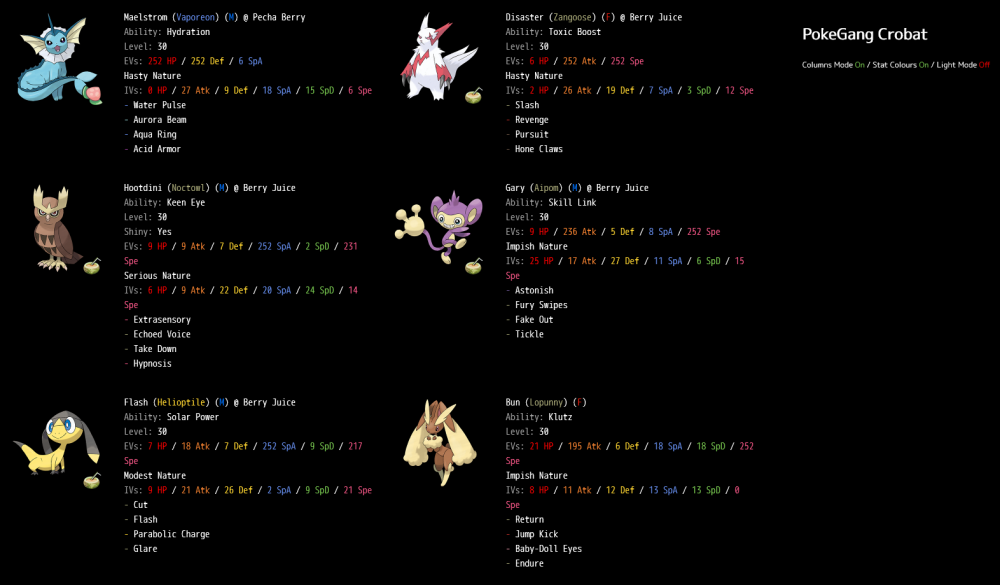
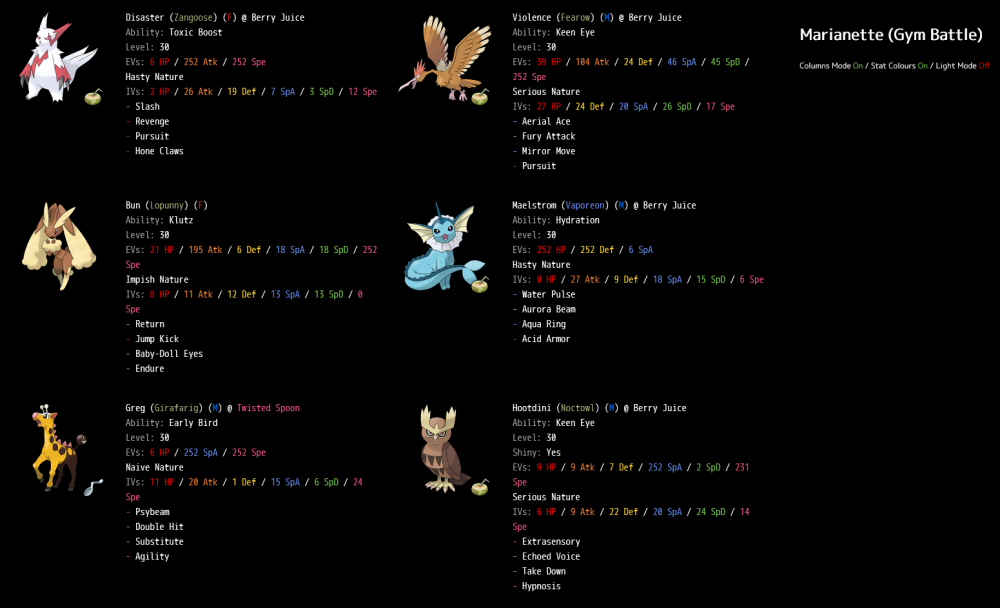
Hi all, we're back with another update. Let's try to get to the end of Chapter 3 today! We pick up after having just dealt with the Ancient Guard Kingdra using some serious cheese tactics. That means it's time to face an equally spooky foe in the PokeGang Crobat, which sits at a nice Lv 48 and is accompanied by four Lv 37 Zubats. At first I thought the Zubats might be a problem for us, but they actually give us an opportunity to set up with Maelstrom and get a good headstart over Crobat. I won't go into much detail here for once, and I'll just show you the team instead: As before, we pre-poison Disaster so that she can deal some serious damage. Here's the battle! Aaand that's Crobat down. That fight went a little differently than when I was testing, usually the first Zubat stops using Acrobatics after two Acid Armors which leaves Maelstrom at higher HP. As a result, it can usually chip away at Crobat a bit before it goes down. Either way, that went pretty well and we're able to claim a Zubat...that we can't use. Either way, we name Zubat "Ratbird" in memory of my beautiful Crobat from my first playthrough and store it in the box. Onto Goldenleaf! We're confronted by Ren at the gates of Goldenwood, who locks us out and drops a hint that we need to find Venam in Gearen. There's a whole lot of story that goes on here and it's super interesting, but I'm not going to type it out here. Eventually we end up at our next Gym Battle, Marianette! I don't expect her to be too much of a challenge, especially after the last two fights, so we've got more or less our usual team: And here's the video! As I expected, that wasn't too hard a battle. The scariest thing on her team might actually be her Lopunny, which becomes bulky incredibly quickly with the boosted cosmic powers whilst hitting hard with +1 Multipulse. The rest of her team is pretty easy to just brute force through though, provided you save a special attacker for Bewear at the end. Anyway, with Marianette out of the way we're able to claim our third badge, taking our level cap all the way to 35! We also get TM42 Facade as soon as we leave the Mansion...and we all know who's getting that! Beating Marianette also signals the end of Chapter 3, which is a great time to end this segment. I might post a quick review of what we have in our box, plans going forward and so on before we carry on with Chapter 4, but maybe not. Either way, until next time...peace!
-
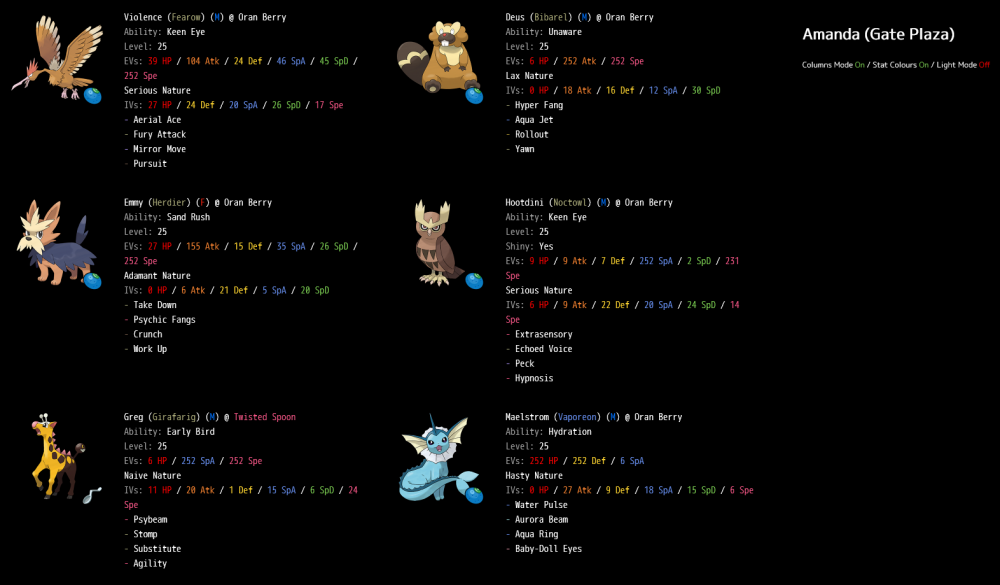
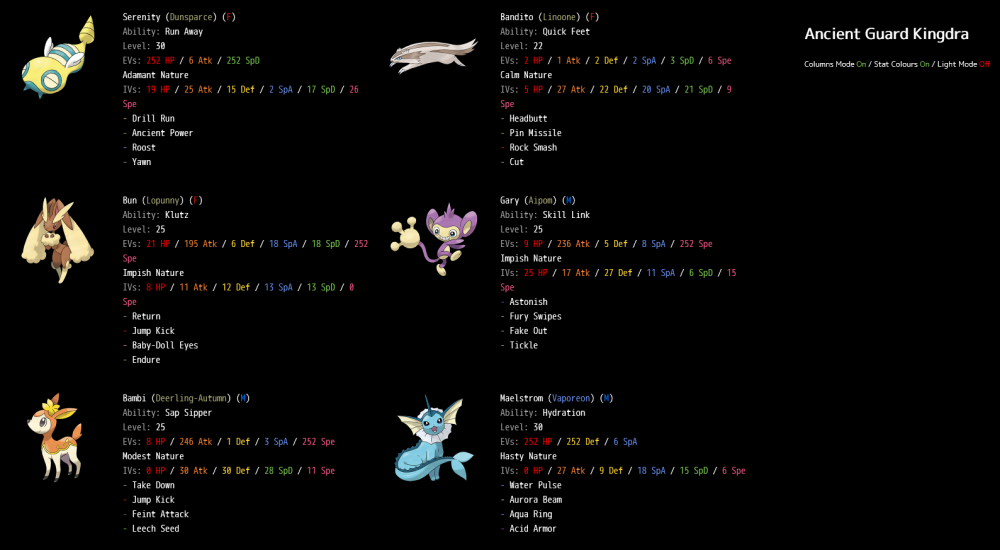
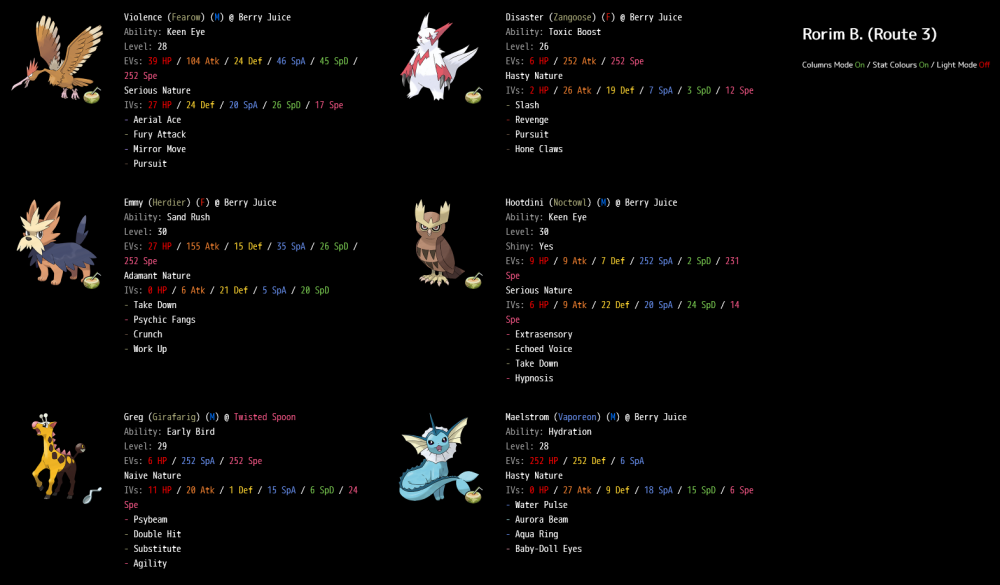
Hi everybody, we're back and ready to get on with Chapter 3! We start off by spending a little time at the Chrisola Casino before going anywhere with the story, which after (many, many) games of Voltorb Flip gives us enough coins to pick up TM10 Hidden Power and TM90 Substitute! The latter will certainly help us in the upcoming fight against Amanda, whilst the former will give us some much needed coverage. Here's a list of the HP types of our special attackers so far: Greg - HP Bug Hootdini - HP Fighting Maelstrom - HP Water (HA!) Reverb - HP Rock Flash - HP Grass Borb (which may end up as a special attacker) - HP Electric Pyro - HP Poison Hootdunnit (our non-shiny Hoothoot) - HP Ice Yoomtah - HP Water Nimbus (our shiny Swablu, which also has crazy good IVs) - HP Fighting Cumulus - HP Dragon That's quite a good type spread, so we should get plenty of use out of HP during this run! With that out of the way, we head towards Route 3 to take on Amanda. At the same time we teach Greg Substitute, which will allow to avoid Thunder Wave from Amanda's Miltank and deal with it efficiently. Here's the team: And here's the fight! That wasn't too difficult at all, especially given that her team outlevelled ours by quite a bit. I think that having a way of dealing with her Miltank was the key here. On her way out, Amanda gifts us with HM01 Cut which will give us access to a few new areas! We also gain access to the drinks vendor in Sheridan Village, who sells Berry Juice at half the price of Oran Berries that give twice the healing. These will really help us going forward! With our newly acquired HM, we head through Amethyst Cave to Pom Pom Meadow, where we catch a Yungoos and name it Smiler. We also pick up a few new encounters (in fact, these are all of the encounters in Chapter 3) on Route 3 and in Mirage Woods: Doduo (Hydra) Zangoose (Disaster)...yep, this is another one of those 1% encounters. Kecleon (Camo) I've been looking forward to getting Zangoose all game. If you thought Violence was dangerous, wait until you see what Disaster can do. Hydra will also most likely replace Violence once we're able to evolve it at Lv 31. We clear out trainers as we head south on Route 3 before bumping into the best character in the game, Rorim B, who challenges us to a battle. Here's the team: We've pre-poisoned Disaster before the fight, which will allow us to take advantage of the +50% damage using physical moves from Toxic Boost. Here's the video! Yep...that was just a taste of what Disaster can do, despite being underlevelled. If it wasn't for the Focus Sash on Vivillon she'd most likely have swept the rest of that fight. Anyway, that's Rorim B down so we're free to make our way to Goldenwood Town! Maybe his musical spirit is rubbing off on me... Before we do though, there's a little sidequest that I'd like to take care of in the form of a very angry Kingdra statue. It sits at a whopping Lv 53 and has moves that can easily OHKO every member of our usual squad. Clearly then, we're going to need some sort of cheese strat to get through this fight. Let's review our options: PP stalling: Kingdra knows Thunder, Bubblebeam and Ice Beam. Maelstrom can tank Ice Beam, and if I use an ability capsule to give it Water Absorb it can tank Bubblebeam too. But we have nothing that can survive Thunder (Bunnelby seems to far away), so that's out of the question. Status: We have no damaging status moves right now, and I'm not sure that we have access to any through level up either. We could try to *somehow* survive a hit and then pray for confusion, but that seems unlikely and cheap. Leech Seed: This kinda comes under the guise of damaging status moves, but it's not quite so I'm giving it its own category (because I can). We have access to Leech Seed through Bambi, but unfortunately Bambi can't take a hit. So...how do we get this to work? We could use a Telluric Seed which gives Spiky Shield on Forest Field, but a Telluric Seed is a pretty high price to pay. That leaves us with just one more option... Dunsparce: Pretty sure Dunsparce doesn't count as a strategy and I'm just making this up as I go along at this point. But we have a Dunsparce called Serenity and with max SpDef and HP EVs she can tank a hit and use Yawn. Bambi switches in and uses Leech Seed and then we win...eventually. Gary and Bun: They know Fake Out and Endure, so they can stay alive long enough for Leech Seed to actually do its job. Everything clear? Good. Here's the team: And here's the fight! That's Kingdra down! It turns out that Serenity being able to tank a hit on the first turn didn't matter there as Kingdra went for a Rain Dance, though I think it only goes for Rain Dance when it doesn't see a guaranteed KO...at least that's what I found during my testing anyway. Either way, with Kingdra down we're able to claim our Itemfinder! This will come in super handy for the rest of the run. And that's it for this segment, next time we'll be taking on Pokegang Crobat and maybe even finishing Chapter 3! I had tons of fun with this segment, I hope you're all still enjoying following along too! Until next time, peace!
-
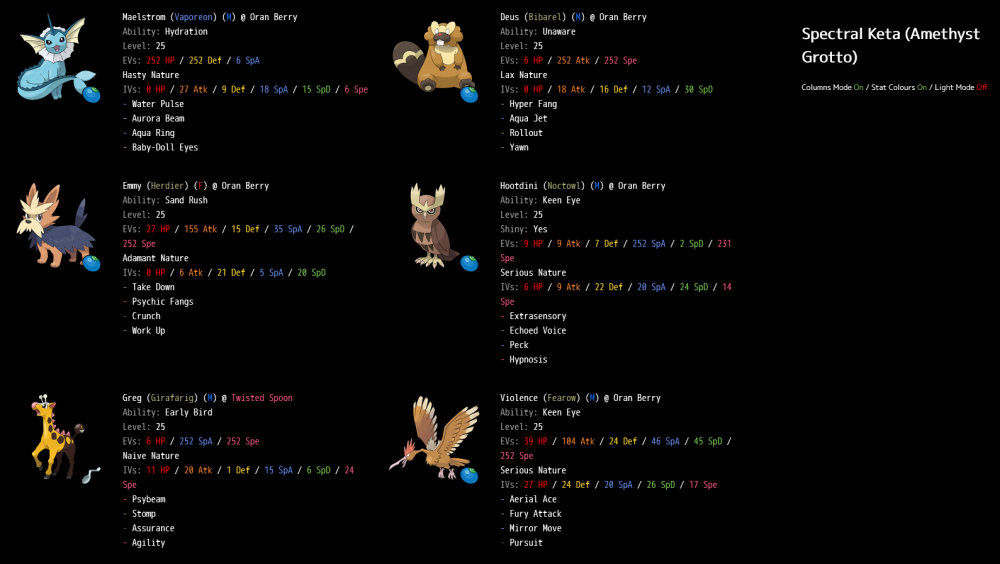
Hi, welcome back! Let's finish Chapter 2 today! We pick after defeating Rift Volcanion and waking up in the Sheridan Arena. The Eldest tells us to meet her in the Spring of Purification, where we're finally able to purify our Meowth from earlier! We nickname Meowth "Rocket" and store it in the box for now. Access to the Spring also lets us catch our last encounter of Chapter 2, Zigzagoon! We nickname it Bandito and store in the box alongside Rocket. As we leave the Spring, spooky Keta tells us to meet him in Amethyst Grotto before disappearing mid moonwalk. There's not much left to do in Chapter 2, so it's time to prepare for the upcoming Keta battle in Amethyst Grotto. If we don't prepare then I expect that this will be a bit more difficult than the last few fights, mostly due or lack of coverage for dealing with his Gabite and Ninetales. Fortunately, we still have the Eevee from earlier and some stones to evolve it. Vaporeon seems like a particularly good choice for this fight, as it learns Aurora Beam at Lv 20 and a plethora of water moves before Lv 25. With that said, we evolve Eevee into Vaporeon which we name Maelstrom! Unfortunately, Maelstrom is male. This means that we can't get another Eevee until we get Ditto a little later on, so Maelstrom needs to carry us for a while! Anyway, here's the team that I decided on for taking care of Keta: Maelstrom doesn't have the best IVs or nature to carry out Vaporeon's traditional role, but with max EVs in HP and Def we should at least be able to overcome its shortcomings a little bit. Anyway, here's the fight! That quite a bit tougher than I expected! Without Maelstrom I think that fight might have taken me quite a while to get past, especially Keta's Ninetales which hits like a truck with the +1 SpAtk sun boosted Flame Burst. After beating Keta he gives us TM103 Stacking Shot (which is a suprisingly good move early on) and our second badge, raising the level cap to 30. And with that, we've finished Chapter 2! I'm still having a lot of fun with this run, although I think that the difficulty will really start ramping up soon; we're nowhere near the hardest the fights in the game yet and I expect that Novae was just a taste of things to come. As always, feedback is super appreciated! Until next time, peace!
-
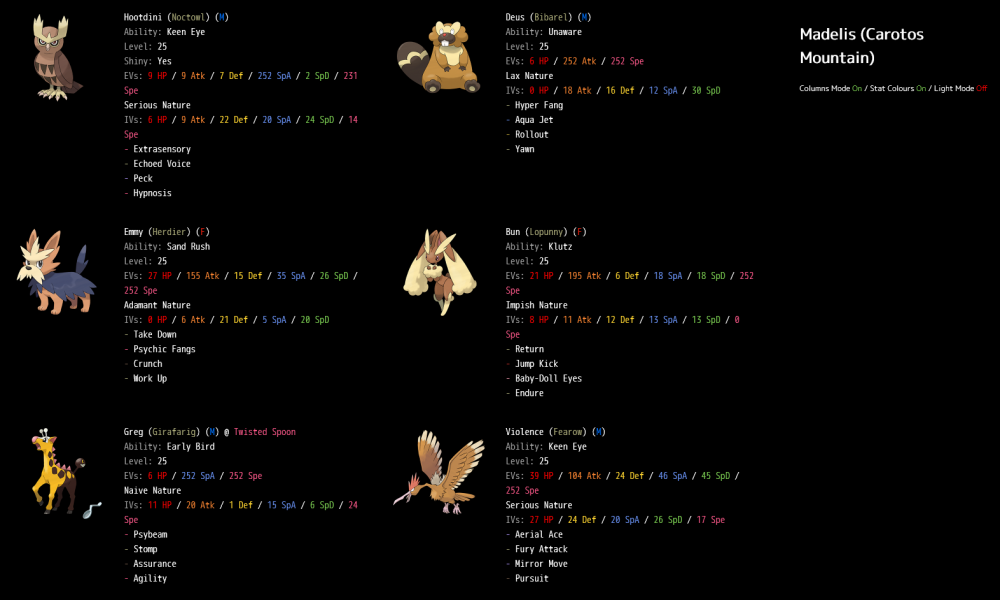
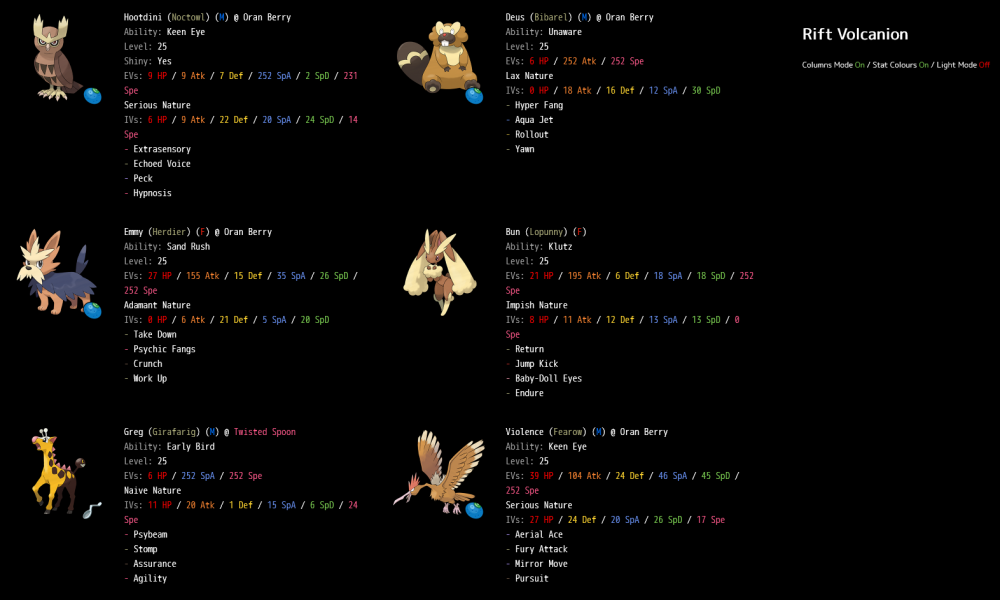
Hi all, we're back with another update. There's not much to do right now other than face Keta, so we head back into Sheridan and set up the story ready for the fight. The team is the same one that we used against Novae: And here's the video! First off, Keta's music kinda bops. Second, that wasn't really much of a fight... Granted I got lucky with a couple of crits and a flinch, but either way that was an absolute walk over. The only factor that made that fight a little challenging when I was testing were the rolls on the first turn. Very rarely Hariyama goes for a Fake Out on Hootdini instead of Deus, whilst Breloom doesn't always get OHKOed by Extrasensory. Either way, that's Keta down and we can claim our second badge...except for the part where Keta runs off. Time to track him down! We team up with Aelita and head into Carotos Mountain to find Keta. Inside the Mountain we face off against some Team Xen Grunts and Memebot-3000, who after some heartbreaking scenes is no more. Sleep tight memerino. Eventually we find Madelis deep inside Carotos Mountain, who challenges us to a double battle alongside Keta. We use the same team as before, as it hasn't failed us so far: Yep, I definitely didn't forget to put berries on my team members before I walked into the room and got stuck there. Anyway, here's the battle! ...I guess that counts as a win. That was my first attempt and I only really went in there to test things out, but things went better than expected! Having Keta on my side to make it a 12v6 made Madelis' team seem a lot less scary, and we were pretty much able to brute force the fight without any strategy at all. Well, blocking Shadow Mewtwo's hits with my face whilst Keta does all the work counts as a strategy. With Madelis out of the way, Keta decides he can 1v1 an angry Mewtwo....yeah, good luck with that. We leave Keta to it and move onto the far less challenging Rift Volcanion with the same team yet again (now featuring berries): Here's the battle! Yep...that's Rift Volcanion. It's also a great time to end this segment. Until next time, peace!
-
Yep! I'm actually playing with a slightly extended species clause too so that I can't use two things from the same evo line, e.g only one eeveelution per team, Spearow and Fearow can't be on the same team etc. My list of rules are all in my first post here! Keta shouldn't really be a challenge anyway, I have tons of flying types and psychic moves to choose from. I think I can even get a Sylveon now if I want.
-
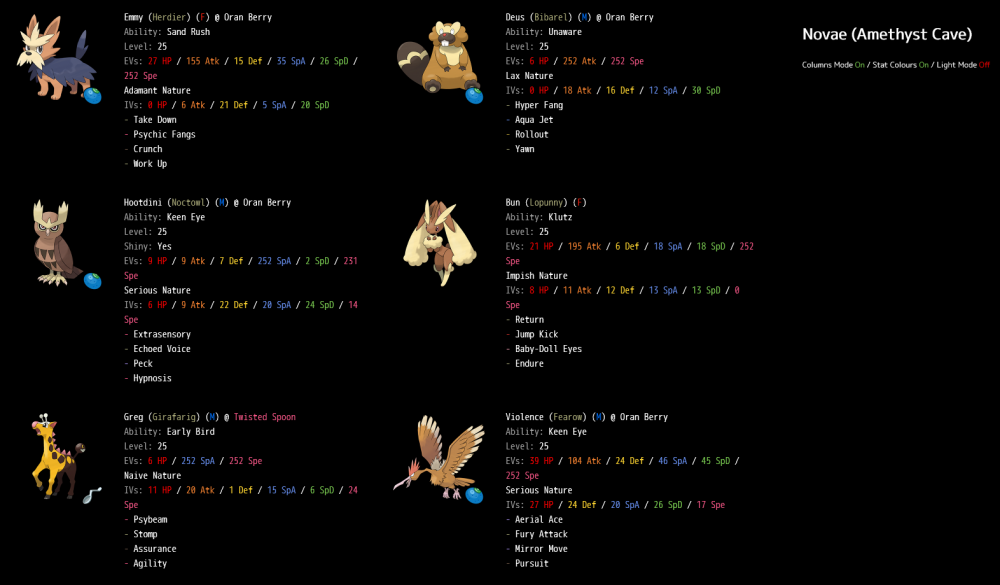
Hi all, here's another update on the run! We pick up where we left off after defeating Rift Galvantula, and make our way through Amethyst Cave to Sheridan Village. We switch out a few of our team members along the way to try and gain some easy levels from the trainers inside Amethyst Cave. Once we reach Sheridan we take on the trainers and Hootdini evolves into Noctowl, whose psychic and flying type moves should serve us well against Keta a little later on. Whilst we're here we also start the Ditto questline, which will come into fruition quite a while later. We make our way to Keta's House to continue the story, catching a Swablu along the way which we name Cumulus. Importantly these Swablu all know Mist which allows them to change the field to Misty Terrain. This may come in handy later! After accepting Keta's request we make our way to Amethyst Grotto, which allows us to gain a two more team members: Girafarig (Greg), I've grown insensitive to it over the years, but seriously what is going on with this thing's tail? Dunsparce (Serenity) Before we move on with the story, we spend a little time completing all of the help centre quests in Sheridan. This will eventually give us access to Eevee, at the cost of another (much harder) battle against Novae *shudder*. On our way to Novae we get a Water Stone from the Hidden Library 2 quest, which will give us access to Vaporeon a little later on. Unfortunately we get an Ice Stone from the Kecleon Quest, which means we won't be able to evolve Dusty until we reach Terajuma later on. I could probably have reset here to force a Shiny Stone, but that's not really in the spirit of things. After finishing off the rest of the help centre quests, it's finally time to take on our old nemesis. This is going to be a tough one as her team both outlevels and outclasses ours, but the team I came up with should be able to get the job done: Before we show the video, let's discuss the team a little for a change. At a glance, the biggest challenge on Novae's team is going to going to be her Lycanroc, which hits hard whilst outspeeding and resisting most of what my normal types can throw at it. Clearly then, we're going to need a solid strategy to deal with it. Introducing Deus the Bibarel, which gains access to a powerful water STAB in Aqua Tail as an egg move through Azumarill, which makes it legal for our run. All it costs is one Heart Scale, which is in truth a bit pricey given that we won't have a sustainable source until accessing the Lv 51+ pickup table, but nevertheless is worth it to get past Novae. That all sounds great, but there's just one problem that observant amongst you may have noticed already...Deus doesn't know Aqua Tail. It turns out the Move Tutor's sister doesn't teach egg moves, so we're stuck with Aqua Jet for now. We also evolved Bun into Lopunny during this segment, whose decent attack and access to Jump Kick should help resolve any of Deus' shortcomings. And here's the video! Checkmate. Wow...what a battle. That really was the definition of every HP counts. We got a little lucky at the end with the confusion on Passimian, but I'm confident that we'd have won there regardless as Violence was at full HP and can 3HKO Passimian with Aerial Ace. That fight took quite a few attempts, team revisions and strategy changes, but we got there in the end. Importantly, we got decent luck in the last fight with no misses on Hypnosis or Take Down, whilst her natures (which I believe are random every time) were fairly kind. For example, from my previous attempts I found that a +Atk nature Lycanroc can OHKO Bun and Deus, whilst a -Def Lycanroc (surprisingly, this is a bad roll) goes into red range after a Jump Kick and triggers a hyper potion from Novae on the next turn. Anyway, with Novae finally defeated for good and definitely never ever coming back, we can claim our Eevee! It's kind of fitting that one of the hardest fights of the run locks away one of the best normal types. We hold off on nicknaming Eevee right now until we decide what to evolve it into. That's it for this (very challenging) segment, hopefully you guys are still enjoying following along! Next up will be Keta and Carotos Mountain! Until then, peace!
-

Starting a Mono type run.
Glint replied to roh092's topic in Official Rejuvenation Club's Discussions
I would definitely recommend taking a look at this guide to help choose a monotype for the run, as well as to let you know what's available in each chapter. I'd also agree with Vum. Some of the types have very little available in the early chapters (e.g ghost, steel) which will make them a bit of a nightmare, so for your first run I'd recommend picking something like normal, grass, water etc. The guide will help a lot! Good luck with the run! -
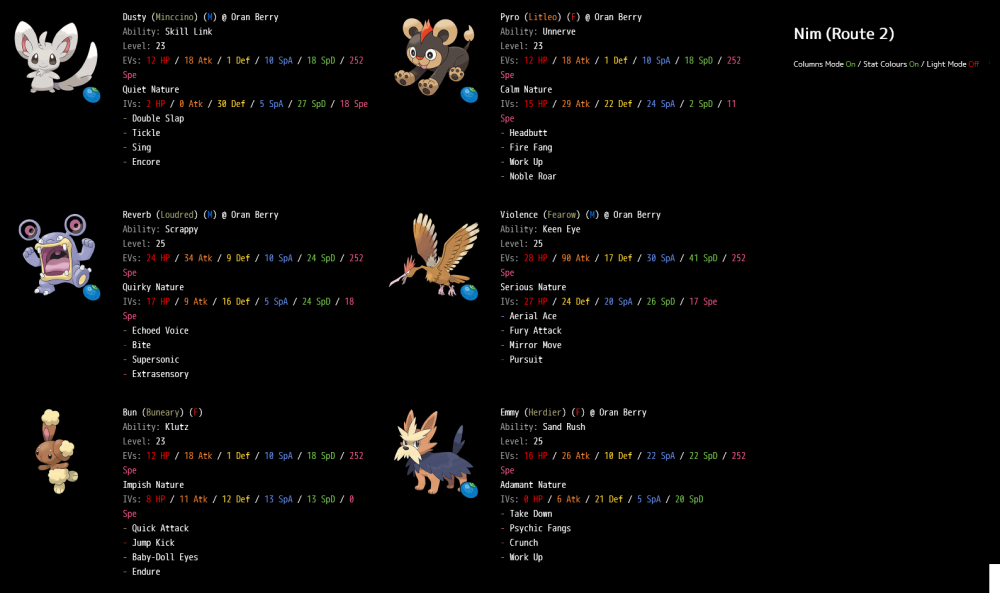
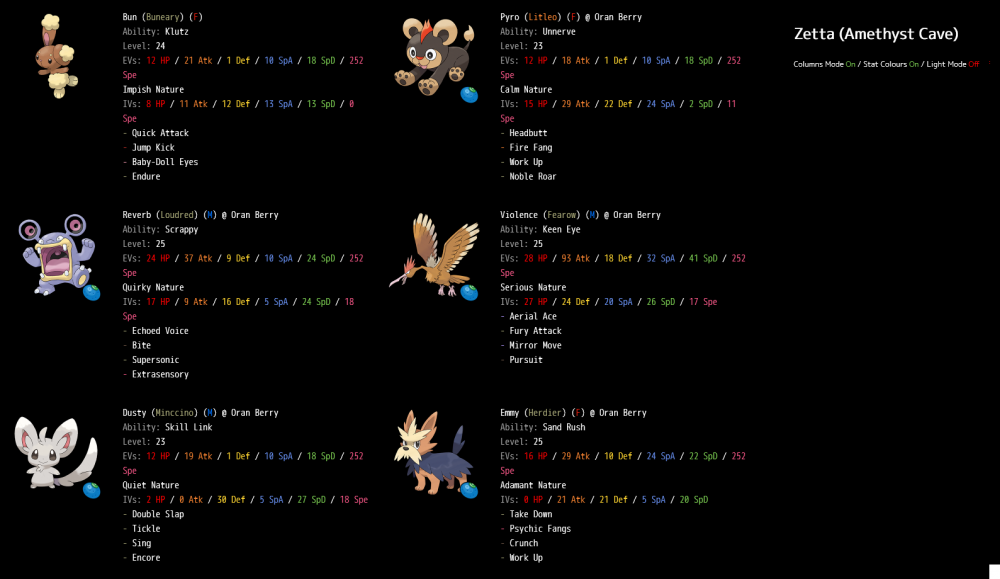
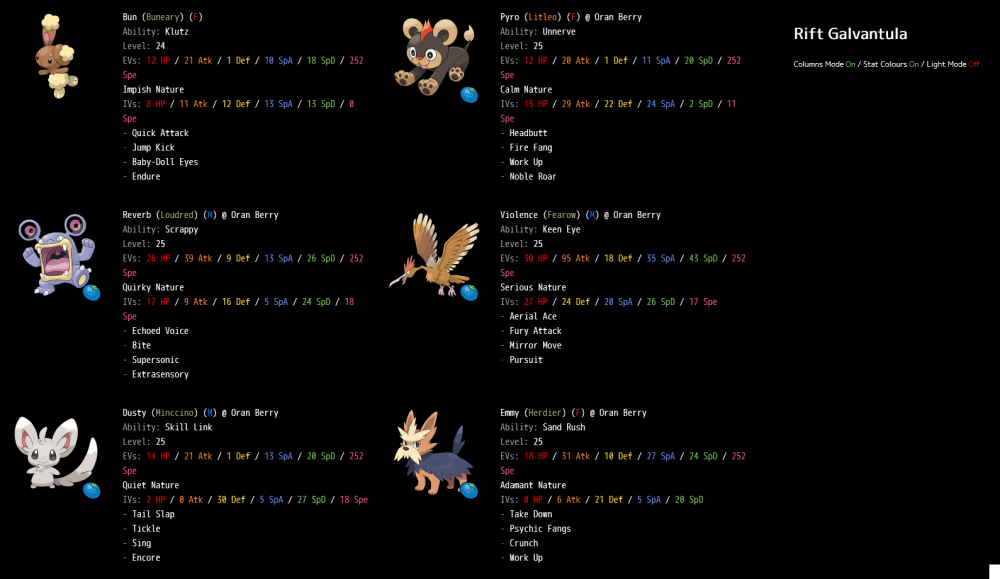
Hi all, we're back with another (slightly longer) update! Picking up where we left off, we need to get past Nim. Unfortunately, our current team is very unlikely to be able to make a dent in her Solrock and Lunatone lead, so we're going to need a new strategy. Taking a look at our box, Bambi seems like a great choice due its part grass typing, but unfortunately it doesn't learn any good grass type moves until Lv 32. We're also unable to rely on Shadowrat and Violence for dark moves, as Nim's psychic terrain cuts the damage from dark type moves in half. Sleep clause also stops us from cheesing the fight with Hootdini and Yoomtah. After a little brainstorming and training (during which we get the Exp. All, which will help a lot), here's the team I came up with: And here's the video: Phew! That was a close one. My strategy here was to make it a 2v1 with Dusty's Sing, whilst keeping Solrock weakened so that it can't spam Rock Slide and wipe our entire team. In the end it worked pretty well. Her other two team members Espurr and Inkay were surprisingly tough to get through thanks to Eviolite, but it turns out that everything can be solved with Violence. Everybody having 252 speed IVs also helped quite a lot here, as our entire team was faster than Nim's. Other than that, I made a mistake in the fight by using Quick Attack on Psychic Terrain, which of course failed. After beating Nim she rewards us with a TwistedSpoon for our efforts and we head into Amethyst Cave to save Melia from Team Xen! Inside Amethyst Cave we stumble upon disaster...Melia has been eaten by a Galvantula! Well, I guess that's the end of the run and we should go and play Reborn instead, or something. Melia definitely won't be coming back later. Aaaanyway, we team up with Ren against Zetta, whose Frogadier should hopefully give us the type coverage that this team desperately lacks. Here it is, for reference: And here's the fight: Honestly that video makes the fight look a lot easier than it actually was. My first two attempts involved some seriously bad luck (namely back to back AP boosts on Minior, and lots of misses) combined with Ren being an absolute idiot. Fortunately this time it went quite well, and we were able to dismantle Zetta with the help of Frogadier as expected. As soon as we beat Zetta we're sucked into the dimensional rift, where we take on Rift Galvantula alongside Venam with the same team as above: Here's the video! This wasn't much of a challenge in the end. I originally thought that psychic type moves were weakened on the dimensional field which cost me my first attempt. My second attempt was plain sailing after I realised otherwise, though. Venam probably wasn't the best choice of partner in the end as her poison type moves couldn't do a great deal against Rift Galvantula, so she seemed to think that Magical Leaf is a good idea instead.... Either way, that's the big fights in Amethyst Cave out of the way, so it's time to make our way to Sheridan at last! Until next time, peace!
-

Who is the strongest boss battle?
Glint replied to CrystalStar's topic in Official Rejuvenation Club's Discussions
Angie was probably the most difficult fight for me on my first playthrough, though most likely due to a lack of preparation at that point. For reference, I was playing on normal difficulty with set mode, no healing etc. (standard competitive clauses). I remember her Crabominable and Beartic being a big part of the problem, mostly because of the Elemental Seed/Slush Rush causing them to outspeed most of my team. The terrain boosted Cold Truth from Rotom really didn't help much either, especially when I wasn't dealing a great deal of damage to her team through Aurora Veil. My strategy in the end was kind of cheesy, but it definitely worked. I led with Pyukumuku to get rid of the dimensional aspect of the field, and then used Dugtrio-A to get rid of the icy part. From there it was pretty plain sailing, since Crabominable didn't get the boost anymore. I think this fight was the first one that really taught me to respect how powerful the terrain can be, which made the fight against Souta later on a bit of a breeze (no pun intended).


